Flashlight with automatic turn-off uses a battery that turns off the flashlight automatically after some time, approximately six to ten minutes, depending on the type of flashlight. Most automated shut-off flashlights turn off to prevent the flashlight battery from discharging and store the battery for use when there is a power blackout.
Moreover, you can reset your automatic shut-off flashlight by following the stated settings on your flashlight. Also, you can shake the flashlight each time you want to reset it. Other times, you may try developing your automatic flashlight instead of buying to reduce the buying cost. The information below describes how to build your automatic shut-off flashlight.
Table of Contents
Steps on how to design an automatic shut-off flashlight
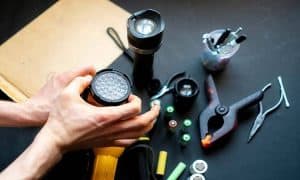
1. Materials required
First, collect all the materials required for the implementation of the flashlight. The equipment necessary includes; a timer, resistor, LED flashlight, cells, a switch, a prototype board, a box, caps, and a channel Mosfet. The equipment should be of the correct type and measurement.
2. Develop the best plan for implementing the flashlight
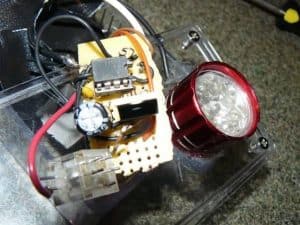
First, connect all materials to come up with a suitable circuit board. Developing a circuit board involves the application of all equipment’s incorrect amount and type.
It is advisable to use the safe wiring method and a project board that matches your preference. For instance, use a radio shack project board and a 22ga wire obtained from the original network cable.
Moreover, use the recommended switch and socket to establish your flashlight connection. The most preferred switch is a tilt switch and a socket that examines and displays voltage measurements. Using a socket and a regulator of poor quality and poor standard can result in poor connectivity or connection; hence the flashlight won’t turn on.
3. Establish a connection using all materials
First, charge your flashlight battery by connecting it to the power supply. Moreover, use a battery with a voltage of your choices, such as 5.0V or any other voltage. Also, ensure you ground yourself using an anti-static wrist band to protect yourself from any power surges.
Connect anodes of the battery to the cathodes of the Mosfet, ensure the anodes are connected perfectly to the LED torch, and the cathodes match perfectly with the terminals of the Mosfet. Moreover, ensure the connection is in stable condition.
4. Connect the timer to the battery power
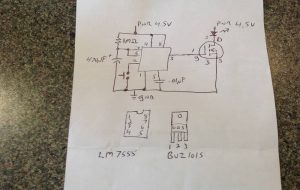
Establish a connection between your timer and the flashlight battery. The most preferred timer is CMOS 7555 since it ensures a stable connection between the flashlight components. Moreover, ensure you match the pins of the CMOS 7555 timer correctly with the Mosfet.
555 timer chip has pins in which; a three-pin is integrated with the Mosfet gate. While carrying out all the connections, ensure you handle all components carefully to avoid damaging the COMS timer or any other flashlight component.
Align the LEDs, establish a connection with the Mosfet, and ensure you use the correct voltage to avoid blowing the cells and even the whole flashlight. The CMOS timer should function once supply voltage decreases, allowing the Mosfet and LEDs to turn off automatically.
5. Connect the flashlight resistor and the caps
The timer works depending on the type of resistor and the cap used on the flashlight. Moreover, it is advisable to carry out resistance and cap calculations before deciding the type of resistor to be used. For example, a formula of 1.2*C*R is applied, e.g., 1.2*2M*480uF cap gives an automatic time measurement of 1152 seconds which is approximately 19.2 minutes.
Moreover, ensure the resistor used ranges from 1M to 10M and caps which are more than 1000uF to get accurate results depending on the timer used. Therefore, it is essential to accurately carry out all the calculations before connecting the flashlight resistors and the caps.
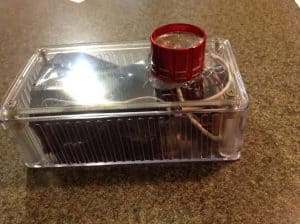
6. Switch on the flashlight to see if it is working correctly
Begin with turning on the flashlight using the flashlight switch and see if it lights on. If the flashlight fails to turn on, it is a sign that the connection you established is insufficient or incorrect.
Disconnect all components and repeat the process until the flashlight turns on. Also, check the condition of the equipment used, such as batteries and resistors, to ensure they are in good condition. If the components are damaged, try replacing them and establish the connection.
Shake the flashlight after turning it on and leave it for some time to sit. Wait for some time, the calculated time, and see if the flashlight switched on. If the flashlight switches off, the whole process is correctly done but, if it fails to turn off, consider rechecking the entire connection and redo the process.
Finally, if you cannot implement your automatic shut-off flashlight, buying the original one from a licensed seller is advisable. Moreover, ensure you maintain and manage your flashlight to prevent the batteries from draining and dying.
How to troubleshoot automatic shut-off flashlight problems
Sometimes, the flashlight may fail to turn on, fail to turn off, among other problems. The steps below give clear instructions on how to troubleshoot the issues without involving a third party.
Flashlight won’t turn on
1. Check the flashlight power connection
Once your automatic flashlight fails to turn on, first check if the flashlight is connected to the power source or the batteries are fully charged. If the connection is unestablished, connect the flashlight to the power source and try switching on the flashlight.
Moreover, check the condition of the flashlight batteries. If the batteries are damaged/blown out, replace the batteries with the new ones and switch on the flashlight again. If the problem persists, power connection, and damaged battery, consider checking other issues.
2. Clean the whole flashlight using recommended material
After checking the battery condition and power connection, clean the whole flashlight using recommended detergent. For instance, use alcohol around all flashlight terminals to remove any corrosion. Ensure all the terminals are clean and dry before trying to switch on the flashlight.
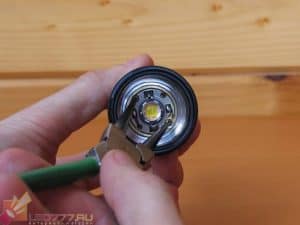
3. Check the condition of the automatic flashlight switch
If you clean the whole flashlight using alcohol but still fails to switch on, consider checking the state of your switch. Open the button by using tweezers and fix the switch issues. After fixing the problems, reinstall the switch back to its position and ensure the batteries are correctly installed.
If the flashlight turns on, then the problem was with the switch, but if it fails to turn on, examine the other flashlight components and try fixing them by following the recommended steps.
4. Check the condition of the whole flashlight
Sometimes, the issue may not be from the power supply, the switch, batteries, or any other component within the flashlight but the whole flashlight. First, check the entire flashlight and see if it is in a good state.
If the whole flashlight is damaged, consider replacing the entire flashlight with a new one. Moreover, ensure you buy an automated flashlight from a licensed seller and of high quality.
Conclusion
Automatic switch-off flashlights exist in different forms, and it is easy to implement the flashlight of your own choice by following the steps above. In addition to that, ensure you follow the steps sequentially to produce a positive outcome.
Finally, the information above will help you troubleshoot the problems concerning the flashlight failing to turn on. Also, ensure you inspect your flashlight more often to troubleshoot any issue and ensure you maintain the flashlight by following the manufacturer’s instructions.