Your passion and love for music might get cut short when one of the Yamaha keys fails. You won’t hear any sound from the key to complete the pattern. It’s hectic, right? Since you decided to venture into music, this issue does happen.
Worrying yourself helplessly won’t change anything, meaning that you have to do something. I know you are wondering now what you should do? Again, don’t worry yourself because we have come to your rescue. We have carried out research on how to fix dead keys on a Yamaha keyboard on your behalf.
Our article contains useful information concerning the problematic keys on your Yamaha keyboard, the causes, how to fix the various issues, and frequently asked questions. This information should therefore help you to diagnose several causatives and work on them right away. Let’s not spend a lot of time on the introductory part; here we go!
Table of Contents
Fixing dead keys on Yamaha keyboard
Sometimes dust may accumulate between the Keyboard’s contact pad and the key, affecting the key’s sound production. If this is the issue, believe me, you won’t hear any sound. There are factors like a bad fuse which may also lead to dead keys; changing the fuse may solve this. On the other hand, aging can be the reason for dead keys on your Yamaha keyboard. It occurs when the keyboard is not aging successfully.
Changing the dead key
Step 1: Disconnecting the power from both the device and the socket
This should be the first thing to do whenever you want to dismantle any electronic device. Doing so is necessary to avoid being electro-circuited. Failure to do so may also encourage further damage to your Yamaha Keyboard. This is the trick and law; disconnect from the power source and detach the power cable from the unit.
Step 2: Unscrewing
These keyboards come with several Philip screws that may take you a few minutes. However, if you have the Philips screwdriver, then the deal is done. Start by flipping over your Keyboard and prepare for the task ahead. Inspect the battery holder before removing the cover.
Use the Philips screwdriver to remove all external screws and the easiest way is to start with the middle one. You will meet 25.5mm and 19.0mm Phillips screws. Remove all of them.
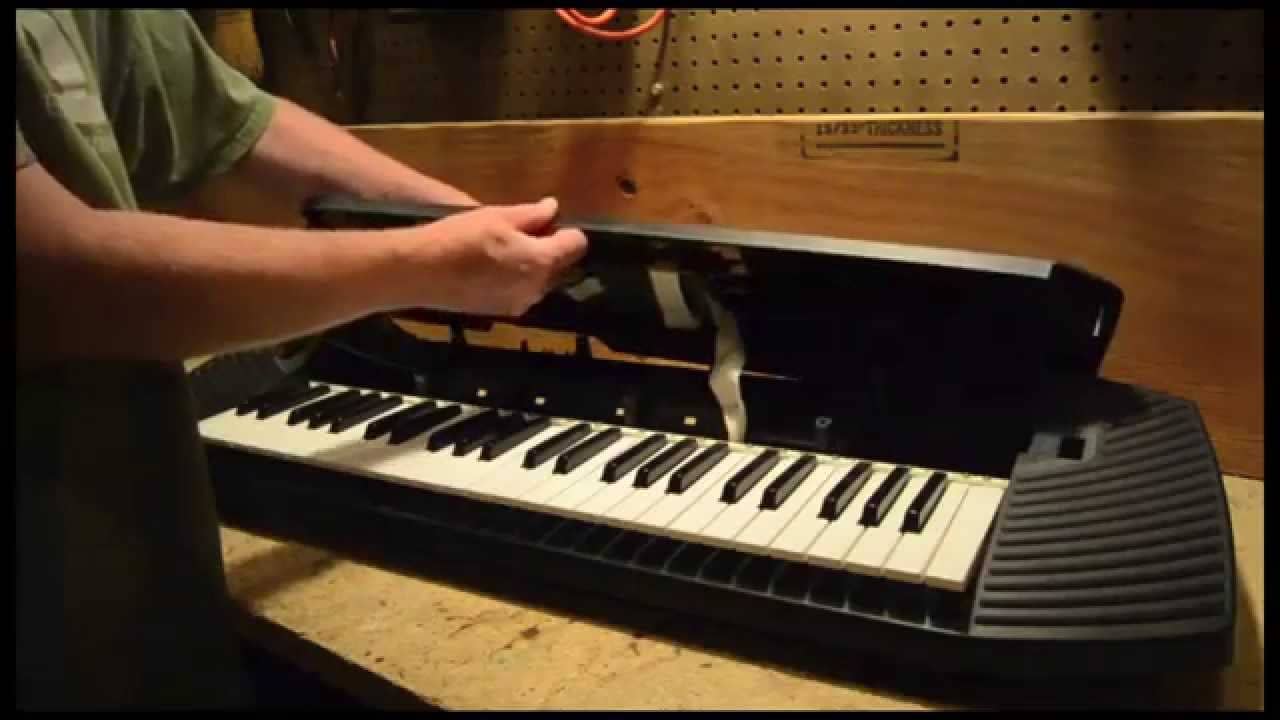
Step 3: Lift the cover
This step is simple but needs a lot of attention because you may cause more harm than good to your Keyboard. Therefore, you should remove the coverage carefully and then put it in a flat space. After doing so, you should then directly locate the contact pad.
The contact pad is simply a long panel where the keys hit to send signals to the speakers which will eventually produce a sound. It’s located below the motherboard and speakers.
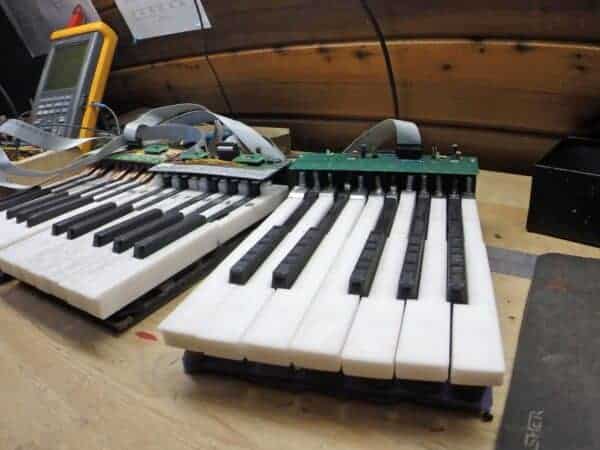
Step 4: Pinching black clamps
These clamps are located on the top of the keyboard’s contact pad. Therefore you should squeeze them closed. After all these components are closed, start jiggling the pad free. This step sounds straightforward, but you need to be very careful of the tiny black hooks. These small hooks are found at the control pad’s bottom part.
Step 5: Removing the Control Pad
If all the above steps are successful, then removing the pad won’t be an issue. There’s no big deal here, what you need to do is lift the contact pad. Do so gently to remove it professionally.
Step 6: Clear dust
From the introductory part, I remember touching on the dust as one of the causes of dead keys on a Yamaha keyboard. Under this step, you can either decide to vacuum or use a dry and clean piece of cloth. The trick is simple; you just have to drive the dust away.
Step 7: Reassembling
Start by gently inserting the contact pad to its specific place. There’s nothing much you can do under this step other than ensuring the pad sits properly.
After the control pad is placed properly, place its cover back. With the Philips screwdriver, insert and screw all the screws to their specific ports. What I mean is that you have to ensure the 25.5mm screws go to the top middle and middle ports. The remaining screws should go to the remaining ports.
If dust was the case, then your Yamaha keyboard should start working. Now, what if you find one of the keys is broken? Use the following guide to solve the issue.
Repairing broken keys on Yamaha Keyboard
Before you do anything; you must start by diagnosing the problem. Of course, your Yamaha Keyboard might be sticky or broken; that’s why it’s not playing any sound. If it is broken, use the following guide to solve the issue;
Step 1: Unscrew the cover
This step involves removing all screws that hold the keyboard from the sides and middle. After doing so, lift the casing to access the keys of the Yamaha’s keyboard. There’s nothing much in this step, rather than removing the casing.
Step 2: Detach the key stop
This component is found on the keyboard’s front part and elongates the instrument’s length. It hinders the movements of the keys.
Step 3: Wiggle the key that you want to get rid of
Start by pushing the same key down and back after removing the key stop. Doing so is inevitable as you want to detach it from the keyframes cut-out. Sometimes this step might be tricky, requesting you to squeeze down a thin object between the keyboard and the key.
Step 4: Cleaning the key-bed
Under this step, you are required to carry out some clean rags and gentle cleaners. The main task here is to eliminate the existing lubrication. The next thing will be to re-apply the piano oil. Lubricating is necessary to enhance the smooth movement of the keys. After this step, your Yamaha’s keys should move freely and play a clear sound.
If this doesn’t work for you, maybe there’s something else for the same problem. But if it was successful, finish the process.
Step 5: Reassembling
Now that you are sure of what you have been doing and now the instrument key is working, reassemble all the parts. You can follow the whole process but in reverse format. Screw back the parts and cover as you found it.
FAQs
What should I do when my Yamaha Keyboard doesn’t stop working?
Maybe you should start by pressing down the right-white key while powering ON your instrument. Release the right-white key immediately after the instrument is powered ON. Doing so is just similar to factory resetting. It will normalize everything unless there are other problems.
Where can one get Yamaha’s Replacement Keys?
My advice to you is to get online services. There are multiple online platforms that offer different services and still, you can buy the best keys for your Yamaha keyboard. Alternatively, you may go directly to the Yamaha website and make your orders. First, you should understand the instrument’s model and key types.
Final words
Whether your Yamaha’s keyboard keys are broken or dead, you can fix them. What you need is essential tools, don’t worry about the knowledge; our guide gives you everything. Playing your piano shouldn’t be ruined because of dead keys anymore.