Fluorescent bulbs operate with the help of an ionization process whereby the ionized gas in the bulb rejuvenates the prosperous coating, making the bulb glow. Now if the light is problematic, it won’t glow because it needs steady and stable electricity flow for the ionization process to be successful.
Count yourself lucky if you’re reading this article because it offers exact answers to your curiosity. We have conducted in-depth research on how to fix flickering fluorescent lights. Operating with this issue might be annoying to your eyes and sometimes it can lead to eye failures.
To spare you from such eye complications, we suggest going through this article so that you can handle the issue for better health. Before seeking the help of an expert, it’s advisable to try some things on yourself. Thank God every information is in this article; what you require is only time and some necessary tools.
Table of Contents
Causes of flickering fluorescent lights and their solution

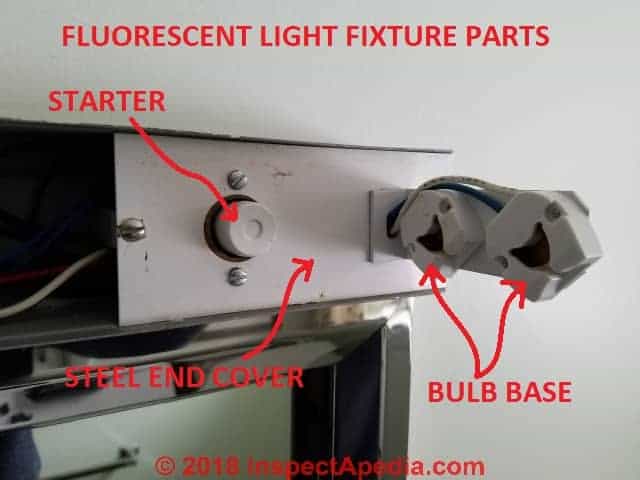
Problem 1: Starter problem
This could be another issue that is making your fluorescent light flicker. The main purpose of the starter is usually to intensify the initial current for initiating the ionization process. Another role is to monitor the arriving electrical current.
This implies that when the starter gets bad or wears out, there will be no light from the tube. If the tube flickers, this means that the starter has just got weak.
Solution: For such cases, the best solution is to substitute the starter. This is simply a cylindrical item, measuring 2 inches or an inch in length and diameter. The starter is inserted into the fixture where power meets. Sometimes starters may be perceived as small bulbs because they stick out.
Now to detach it from the fixture, you should power the bulb and then give it a few minutes to cool. Use a screwdriver to remove it in case it features threads. Those with pins should be pulled; no need for unscrewing.
Inspect for patch number usually stamped on its side and search online for a replacement. This doesn’t necessarily mean that you should rely only on online platforms, but also check in the nearest electronic shop.
Sometimes you may not get the exact one; don’t waste your money because it will not work. The best thing will be to substitute the whole fixture.
If you were lucky to find a starter, reinstalling it is simple as you only push or screw it in the fixture. To make sure the process was successful, try powering on the light and observe whether there’s still flickering; it should be stopped by now.
Problem 2: Bad electrodes
Faulty electrodes remain the stubborn suspect that should be held responsible for flickering in fluorescent bulbs. If these components are worn out, the bulb will start to glow at the ends and dark in the middle. Sometimes this issue may also indicate the malfunctioning ballast.
Solution: To be sure which is the real problem, you should start by powering the bulb and then disconnecting from its fixture. Test the bulb on a different fixture that you are sure is in good working condition.
Removing the CFL bulb from the fixture is straightforward as you only have to use a screwdriver to remove it. However, you may spend a few minutes while removing a fluorescent tube.
To achieve this, you are required to push the bulb towards one end and then twist it 90 degrees so that the pins are released. The next thing will be to drag it out; remember to handle it with great care because it can fall accidentally.
If after trying the tube on another fixture and you still experience flashes, maybe the time is ripe for you to substitute the tube. While opting for a replacement, you need to make sure that you get the tube with a similar diameter and length to that of the old one. Failure to do so will leave a blackout; it will not fit and means no light.
Problem 3: Ballast replacement/repair
The Ballast works similarly to a starter but tends to be a bit complicated component. It’s normally found behind the cover, meaning that a loose wire in the ballast box may result in flickering. You should therefore ensure that this device is in good working condition.
Solution: The first thing to do is to remove the cover plate. Check the status of the wiring in the box and if the wiring is in good condition, then the issue might be emanating from ballast. Replacing it can be the best way to go. Work on the problem immediately after spotting it since it may overheat.
Cutting the wires of the ballast will allow you to remove it easily as a complete unit. However, you should be careful not to forget the connection. Some experts recommend taking a picture and using it when installing a new one. Another precaution to take seriously is to make sure the replacement you purchase matches the old one.
Simple tricks/tips when fixing flickering fluorescent lights
1. Make sure the substitute lamps are the right type
Installing the wrong bulb means that it won’t match the existing ballast specifications. Failure to do so will automatically result in no light. Therefore you should make sure that your replacement bulb has similar specifications to the ones in the old one.
2. Replace the lamps immediately to prevent burnout
Inspect your bulb for black circles at its ends. If this is the case, replace it with immediate effect. Doing so is necessary as you’ll be preventing further damages like burnout ballast. This is a simple trick that should be adhered to if you don’t want to incur unnecessary costs.
While replacing the starter, ballast, or lamp, make sure the lamp pins are properly aligned in the sockets. The bulb will flicker or burn out earlier than expected when the pins aren’t properly positioned into the socket. It’s also a simple trick that can solve flickering in your fluorescent bulb.
3. Ground the lamp fixture
Grounding is necessary for any electrical transformer. For this reason, you should run a copper wire from the fixture’s metal frame to the ground. Failure to do so may result in your lamp flickering or sometimes even burning out.
4. Avoid using traditional magnetic ballast in your fluorescent light
Sometimes your fluorescent may flicker due to the magnetic ballast which makes it perform poorly in cold places. The light will take a few minutes to flicker to get warm. To solve an issue, substitute the existing magnetic ballast with an electronic one that is suitable for cold places.
FAQs
1. Why are my light bulbs flickering on and off?
CFL bulbs contain ballasts that are electronic elements in the sockets. Therefore, the main culprits to be held responsible are worn-out ballast or starter.
2. This flickering bulb is annoying. Can I really fix it?
Of course yes, our guide has provided enough information on the same that I am sure it will help you.
Where can I get replacement ballasts or starters?
Any electronic shop should have these components or sometimes online platforms like Amazon. However, making online orders should involve a lot of care not to buy a mismatch.
Final words
Here we are! At least you’re now in a good position to fix flickering fluorescent lights. Our guide has provided more than enough information on how to achieve this starting from causes, fixes, and then simple tricks to stop flickering in your light. Make good use of it for your own benefit.