Doorbells are very significant in one’s life, especially when one is a social being. They notify that someone is at the door or even at the gate. In circumstances where one had an expected visitor, there is no need to stand by the door or listen whether there is a knock. Doorbells are, therefore, time savers, and with them, one can concentrate on their work without minding door knocks.
Doorbells can, however, stop functioning accordingly, for instance, where the doorbell won’t ring or even where the doorbell does not stop ringing. These malfunctions can be addressed straightforwardly, and the doorbell continues to function appropriately. In most cases where the doorbell won’t stop ringing, the wires are most likely to have shorted together. This article will help you fix a doorbell that won’t stop ringing.
Table of Contents
Main reasons as to why doorbells may keep ringing
Doorbells may keep ringing without anyone pressing on to the button, and they constantly nag you and your home mates. You should always be aware that this device is subject to wear and tear when used for ages without proper maintenance. The common reasons are;
- The doorbell button might have stuck inside, making the doorbell ring all through. Where there is a sensor contact in wireless doorbells.
- The mechanical doorbell chime may go off. A mechanical chime uses its physical bell and mechanical hammer to produce a traditional ‘ding dong’ sound.
- The frequency in which the doorbell is used, for example, if a doorbell is frequently used, there is a higher possibility that it will get used to ringing and may sometimes start ringing by itself. This mainly occurs where the doorbell is wireless.
- The transformer being outdated and hence the functioning will not be effective.
This commonly occurs due to the dirt and dust from people’s hands. Thus, the button does not slide backward, thus constantly ringing the bell.
First, clean the wall area around the button and concentrate mainly on the surface where the button is installed. You should always be aware that the gap between the sensitive area and the button enlarges when the button is off. When the gap is reduced due to the dust or dirt, electrostatic charges might be discharged. The bells can often go loud due to;
- Presence of specific vibrations on the surrounding
- Moisture around the button
- In the case of an electricity fluctuation, though, it is ignored at times. It is always advisable to regularly maintain your ring doorbell.
Steps on cleaning your doorbell
You need first to get the following tools; a screwdriver and compressed air.
- by using the screwdriver, remove the button from the unscrewed bell body.
- check for any dirt or dust that may be stuck between the switch or even around the button. Clean it off.
- clean the button thoroughly and do so to all its housings.
- to remove the remaining dirt particles on the areas where the hand cannot access, blow the compressed air on the button and its surroundings. You can spray a little WD 40 solution between the button housings if you need to clean the doorbell to your satisfaction. Be cautious not to overspray as the liquid will attract dust particles around the button.
Changing frequencies on your doorbell
These problems mainly may arise where another nearby device is using the same frequency signal causing signal interference. Since the regulatory bodies allow the public to use devices of specific frequency bands, chances are higher that more than one device might be using the same frequency band.
Always note that where neighboring products use the same frequency, signals might be interfered with. To solve this, one can use a privacy code in which it helps feed the exact magnitude of the operating frequency of your device.
The transmitter and the doorbell should be having the same privacy code so the bell can utilize the frequency signals to work. The privacy code is in some other devices known as the channel selector.
Solving problems on an outdated transformer
The best option is always replacing it with an updated transformer. However, several precautions should be observed.
- Transformers can be health hazardous when proper safety measures are not taken. They should be handled with utmost care.
- When unscrewing the bell, care must be taken not to damage the walls of the bell.
- Be keen enough to avoid damaging other components while removing the transformer.
- Arrange the right transformer, which is at least 16 volts AC and 30-volt amperes.
Installing a new transformer
- Switch off the power supply to the bell. It is also advisable to turn off the breaker as well to ensure maximum care is observed. Make sure no electric current is complete to the transformer.
- In a junction box, you will find the old and outdated transformer. Remove it carefully, not forgetting it is a health hazard.
- Locate three similar wires connecting the transformer to the power supply and pull them out.
- Spot all the wires connected to the terminals and disconnect all of them. If you are not an experienced person on this, take a picture of the installs to avoid confusion when installing them back.
- Pick the transformer out of the box and replace it with the other updated ring transformer.
- Reconnect the wires by referring to the photo you captured and then turn on all supplies. When connecting your two wires to the screw terminals, screw them to any terminal. This means that no old sequence is required.
- Now, you need to set up your ring video doorbell again. You need to find the ring app, and on the ring video doorbell, select device health. Read the voltage quality, and if it reads ‘good,’ then you are good to go. Switch on the power and ring the bell to test whether it was successful.
Installing a diode on your doorbell
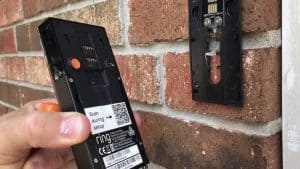
- It would help if you disconnected the circuit breaker to stop it from powering the ring device and take out the doorbell.
- On the mounting bracket, you need to insert the leveling tool. Place the bracket in a position in which the power cables can be accessed, and for the bracket to balance, utilize a level tool.
- Tighten all the holes using your screwdriver and ensure that it is mounted safely. Drill all the openings, disconnect the bracket’s leveling tool, and connect the ring doorbell to your home cables. Directly connect the diode to the bracket and make sure the diode’s black plastic component is in the bracket center.
- Attach the ring doorbell and the door flame. If it does not work, consider resetting your device.
Conclusion
Fixing doorbells that won’t stop ringing may seem very simple when all the above steps are followed. It is not always advisable to fix these appliances at home, mostly when you are not an expert. When you need it, I recommend following all steps to the latter and with utmost care.
There are times when these steps may not work well on particular devices, or maybe the problem may not relate to the above steps. In such circumstances, you should always contact an expert to avoid wrecking your device. Always make sure you maintain your doorbells and check on their functioning as many times as possible.