When you need to set up a home theatre, a receiver with two or many channels may be required to create the required cinematic surround sound experience. It’s only true when you have 2.0 stereo and high-grade surround sound systems. If one or more of your receivers is blown, it means you have less channel for connecting to a speaker. This can lower your sound surrounding the experience.
The article below will show how you can fix a blown channel. To be able to fix the blown channel, you start by looking if, by any chance, the controls may be corroded, then ensure you clean them. If they are okay, look at the cable connections, look at the fuse, and then fix any overheating issues.
Table of Contents
Channel Receivers which are often blown
Any Receiver channel may be blown any time, in most cases when the volume is turned up too loud. However, sometimes all your receiver channels may be blown at the same time. This may mean that you may lose the two channels when using a stereo receiver at once.
A blown Channel Receiver
Sometimes when using a surround receiver or maybe an AV receiver, you can lose multiple channels at a go, making the Receiver completely non-functional. It is important to understand that 5.1 AV has five channels, which means it has 5 built-in amps and a subwoofer output preamp.
The modern Receiver has advanced protection circuits that can identify volume levels that can be dangerous and shut down promptly. They function as digital fuses. This lowers the chances of hardware being blown, though it is still possible. Any channel receiver can be damaged, but you begin by evaluating the nature of the damage for you to fix it.
Is your channel receiver blown?
Before getting into various fixes of a blown receive, you need to look if truly the channel is blown. For instance, many people find ways of connecting speakers externally to TV without a Receiver if channels are damaged before fixing the problem with the Receiver. If a speaker connected in a certain channel may not be working, it does not mean that it is blown. First, you should switch out the speaker then swap the cable connection then check what happens. If the replacement speaker does not work, you should know the problem is not sorted out.
Most probably is that the volume or maybe the balance controls might be dirty and sometimes corroded. In such a case, you may need to have your controls cleaned if you have distortion. First, they need to be cleaned using a contact cleaner. If the problem is not solved, please follow the steps below.
Tools needed
These are tools you may require to try fixing your Receiver:
- Soldering iron
- Solder
- Philips screwdrivers
- Electrical contact cleaner
- Compressed air
- Continuity meter
Easy steps on how to fix a blown channel on a receiver
1. Check connections of the cable
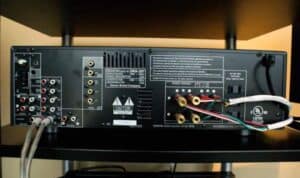
First, switch off everything. After that, check all cables and confirm if they are inserted well into the Receiver and other important hardware parts in your system. For example, if you have wired speakers, ensure that the cables are plugged firmly into the connection ports of the Receiver’s speaker. If it’s properly connected, maybe there is another problem, so move to the next step.
2. Examine the fuse
Step 1: Look whether the fuse is blown
In most cases, you find that the real problem is the fuse that gets damaged and not channels. When you play too high volume on the Receiver, the fuses short out, and sometimes the fuse knob at the back of the Receiver may switch off.
Step 2: Look if the receiver fuse is damaged
Unplug the Receiver as a precautionary measure, ensure no electrical problems, all devices have matched well, and turn on the knob. For instance, a fuse can blow if something is short to the ground and it feeds.
Step 3: Look for a blown Receiver
If it fails to solve, carefully look at whether fuses are blown. You can know that it is damaged when the metal filament is broken or it has a black appearance in the middle. Use a multimeter or a continuity meter to check the fuse. Sometimes. If you notice a dark discoloration within the fuse, this means that it is blown.
Despite the condition of the channels on the Receiver, you need to fix the fuse first if it’s blown before solving any other problem.
Step 4: Pull out the fuses
Check and ensure that the system has no electrical issue and correct impedance matches. Carefully remove the blown fuses to examine them further. Sometimes you only tell the strip’s metal inside is burnt if you pull out the fuse. Moreover, it would help if you were extra careful so as not to break the glass. Finally, slide the fuses out and in; if it does not work, use the screwdriver to open the case, protecting the fuse.
Step 5: Replace the fuse
After ascertaining that it has been damaged, then you need to go ahead and replace it. New fuses are mostly found in electronic shops. However, you can get them online. Note rating of fuse before fixing to have the correct one. Rating of fuses is done in terms of voltage and their current, e.g., a 100V 5A fuse. Then, fix it firmly using a Philips screwdriver to lock the protective case.
After fixing, test your Receiver to ascertain if the problem is fixed.
Step 6: Switch on the Receiver
Take your Receiver, plug it in, and then turn it on. If there is power in your Receiver, then your issue is fixed. If it has not worked, then you need professional assistance. Most of the modern components are very delicate, and they get blown easily. It is possible to destroy them if you don’t have professionalism.
3. Clean the CD tray [For older Receivers]
In some instances, the Receiver needs to fix the air compressed into a CD tray to clean dirt on the CD player.
4. Check for overheating
It would help if you also cleaned the vents intake on the side of the Receiver. If dust has blocked, suspect the Receiver will overheat, and it can make it shut down. But, again, this is a small issue and more so when no hardware is blown.
5. Check for blown Transistors
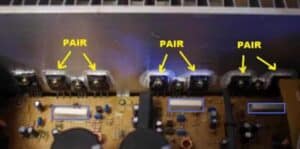
Transistors are important components; if you open the Receiver, you find several transistors. Unfortunately, these components get damaged easily, so you need to check if any may be shorted.
6. Seek professional help
If you have passed through the fixes and the receiver powers on and turns off or does not perform well and power channels, we don’t recommend a quick fixing at home. Instead of wasting time, seek professional help. The process involves replacing damaged components. For instance, you might have shorted transistors output which can blow other circuits.
How to know whether channel your Receiver is fixed properly
Before you conclude that a blown channel receiver is fixed correctly, look at whether it performs all functions well. It should do the following;
- Connect and turn on video sources
- Connect and turn on audio sources
- Decode sound –surround formats
- Amplify audio signals
- Drive multiple speakers
Conclusion
It is a common thing that your channel receiver may blow up. It could be due to high volumes or overheating issues resulting from loose cable connections or issues with the Receiver’s fuse. Ensure you inspect the problem first before setting to correct it.
If you suspect any of your receiver channels has blown, troubleshoot to find out where the main problem is. By following the steps above, you will be able to fix the problem quickly. If the hardware is blown, then it is good you seek professional help.