An audio mixer can boost the quality of the audio inputting into the camera. Again, you can record multiple audio inputs at the same moment. YouTubers, DJs, singers, etc., professionals use the mixer to input more than one audio while recording the videos. If you want to run a YouTube channel, you should use an audio mixer with your DSLR camera.
Good cameras for YouTube can easily be connected to an audio mixer blender with your DSLR camera if you want to establish a YouTube channel.
In this article, you will find well-explained steps and procedures to help you connect your audio mixer to a video camera with ease. The methods are well outlined. For better understanding, the answers to the frequently asked questions are also highlighted below. Follow the steps keenly to get the best results. Where the need is, make sure to contact an expert.
Table of Contents
Methods of connecting an audio mixer to the video camera
The Audio mixer method
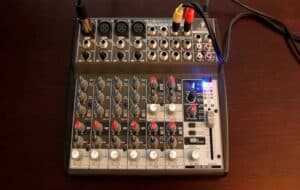
The clarity of the input signal may be improved using an audio mixer. Again, several audio inputs may be recorded at the same time. The mixer is used by YouTubers, DJs, singers, etc. since more than one audio must be entered when filming the videos. You should utilize an audio mixer for your DSLR camera if you want to establish a YouTube channel. Good YouTube cameras may be linked to a sound mixer.
The procedure of using the Audio mixer method
The audio mixer does have the ability to input various audio streams. However, without any mixers, the cameras may play or record stereo audio on a single channel. You must thus follow these steps:
Procedure 1; if you want to utilize your mics as camera input, you must purchase an XLR for each microphone. This helps you to connect the microphones to the DSLR. To make a single quarter-inch cable, collect two 3.5-millimeter stereos. You may also use any audio input here. But additional wires are needed.
Procedure 2; suppose you use a dynamic microphone regularly. It would help if you bought a male or a female XLR cable or a quarter-inch XLR for the microphone input. In addition, this will help to record the audio.
Especially when you share or record a podcast, this will help you understand the sound quality once everything has been adjusted. Finally, you’re going to need something more; 0.75 inches to the 3.5 mm adaptor. This allows you to plug in the output of your headphones.
Procedure 3; you now have all the supplies or tools at your disposal. Take the microphone, then connect it to the inputs of your microphone. Some audio mixers include preamps such as 1 or 2 to input the microphone jack. Then link the phone to another port with the two 3.5-millimeter multipurpose quarter-inch cables.
Procedure 4; let’s do something more essential. Use 3.5 mm to hook your camera with twin quarter-inch mono wires. This is the primary output you have to connect to the camera’s microphone input.
If your cameras have a single microphone input option, the likelihood of an audio equalization is reduced. You may thus have to make some changes. The camera cannot tolerate louder input from the sound mixer.
Procedure 5; Now, set all the inputs to zero or neutral to start the program. This is not necessary since the input level may be changed to the appropriate level. The primary mixing dial helps to boost all input levels. This is certainly included simultaneously for balanced input.
Your videos may start recording. The sound from your smartphone, the microphone, etc., all the videos will be captured with your webcam concurrently. Every input will be captured on your camcorder’s SD card.
You may test the configuration, play audio files on your smartphone and operate the camera device by connecting your phone to your Audio Mixer. If everything succeeds, you have certainly linked the audio mixer correctly to the video camera.
Frequently asked questions
1. How can one record house sound for video recording to get good clean audio?
Use an AUX SEND port (mixer) with the “signal inputs” port mostly on a direct box using a 1-meter shielded audio wire. The XDR signal outputs (direct box) are then connected to the input port of the microphone using a 1 to 2 m wire.
Next, connect the second output port to a little stereo receiver, then listen to the signal using headphones. Wait until you hear the signal coming out and say instantly if it is nice and clear or distorted.
Never proceed with an unstable setup to your live event. Given enough time to connect and set up everything as instructed and then create certain test recordings with the mixer patching fake audio material.
Pull the video material back into the computer from the camera and use your preferred media player to listen and check the audio recording portion of the video. The AUX SEND port will have its loudness level (gain control) for the signal to be switched up or down as necessary.
2. How should one create a second digital audio simultaneous recording utilizing a mixer feed?
One method is to attach a Tascam digital CD recording device to one line, much like the tape recording device. A tiny digital voice recorder like the one from Olympus, Sony, or Panasonic is another option. $50-$100.
Make sure the microphone connection you receive is external and also switches between LINE LEVEL and MIC LEVEL. Set the microphone setting to LINE LEVEL and link the DVR from the mixer to a record outline. Then start DVR recording shortly before the event begins. After that, it will just sit and record everything that passes through the mixer.
3. What is the primary reason for the alternative audio capture (DVR or Tascam)?
If you still receive a poor sound recording in the video camera footage, you will need an alternative digital voice recorder to be used as a backup. You may import this alternative audio with a decent audio editor such as Sony Sound Forge Audio Studio 9, whereby the sample rate fits the video camera soundtrack sample rate.
You may then use your video editing program to ‘sync’ the alternative audio channel to the original audio track of the camera. After perfect synchronization has been established, you may switch off the camera’s audio track and utilize the alternative.
Conclusion
To conclude, depending mostly on the mixer, the output levels of an XLR to 1/8″ converter may peak anywhere between 0dBV to and 30dBV, which overloads the Camera micro input. The sound quality is always degraded by the wireless; if possible, it should be avoided. A basic adapter will not work; to convert lo-z (XLR) to hi-z, you have to use a transformer. Always remember that every output is usually recorded to the SD card of the camcorder. The Audio mixer method is the main method used.
When you are done with the connections, it is advisable to play some audio files. If the soundtracks of the audios are heard, then your connection was successful, and you can now enjoy your music. If the sounds are not heard, you need to repeat the connection or check on the loose connections. If the connection does not work for you still, you need to contact a professional. Professionals are mostly recommendable as they make the work easier and are aware of all the requirements.