Fixing a Kodak camera that has stopped turning on is allowed. It is also economical. In circumstances where your camera won’t turn on, you need to follow very few steps for your camera to start working normally. Fixing your camera will save you a lot instead of buying a new one. Of course, it would help if you were keen enough when fixing or when troubleshooting it.
This article will help you fix and troubleshoot your camera with ease. It contains different methods of fixing a camera that won’t turn on. The article will also highlight the different ways to know whether your Kodak camera is charging or not and what to do when it does not respond to charge. For more information on the Kodak camera, answers to the frequently asked questions are also highlighted. Follow the given procedures and highlights keenly to fix your camera successfully.
Table of Contents
What to do if the Kodak camera does not turn on
To troubleshoot the camera, remove the battery and check to make sure it’s the right one before replacing it. After you ensure that it is the right one, replace the battery with the one that has been fully charged. When you successfully replace your battery, restart your Kodak camera by placing it in a Kodak Easy share camera dock. You should always know that the Kodak EasyShare is sold separately.
It would help if you then restarted the camera by connecting it to a Kodak 5-volt AC adapter. Note that this adapter is also sold separately. In case you need to get more information on batteries, go to the battery information section.
Fixing a Kodak camera that won’t turn on
There are various steps to fix your camera in case it does not turn on. You need to follow the steps keenly to avoid skipping any of them. The following are the steps to consider;
- Make sure the POWER switch is turned off.
- Remove its batteries and set the timer for one minute.
- Switch the POWER OFF/ON switch to ON.
- For 30 seconds, hold and press the shutter button.
- It’s time to release the shutter button now.
- Make sure the POWER switch is turned off.
- Replacing the batteries is a simple task. Finally, charge your Kodak camera once more.
How to tell whether your Kodak camera is charging
To charge the printer dock, plug in the AC adaptor. The Kodak Ni-MH recharging digital camera power pack and the Kodak Li-Ion reusable digital camera battery system can use both charges for up to three hours. Once the camera battery is fully charged, the camera battery status indicator on the printing dock blinks green.
You need first to check the connection points. When you are charging your camera, there are three main connection points that you should always be keen on. The connection points are as follows;
- The power cable outlet
- The power supply cable
- The power supply connection direct to the camera
Check for loose connections, and if any, tighten the connections. If any of the above points are loose, this automatically means that the camera is not charging. Therefore, when checking the connection points, you should put more focus on the camera connection.
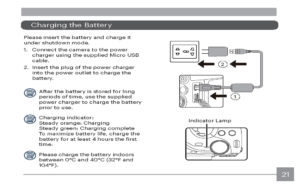
After successfully tightening the connection points, you now need to check the camera’s charging status. If the power light on the power supply is on, this means that the connection to the wall is satisfactory. Next, inspect your camera’s power button and note a blue circle light just about the camera’s power button.
- A single flicker shows that the camera is still charging
- A double flicker shows that the camera is completely charged
- Solid blue lighting shows that the camera is turned on
Troubleshooting Kodak cameras
1. The life of the battery is very short
Make sure your metal contacts on the battery are nice and clear of dirt when utilizing a rechargeable battery. The battery may be close to the end of its working life – as the battery ages rechargeable, they lose the capacity to retain a full charge. Take the battery replacement.
2. The battery isn’t charging
Some cameras from Kodak charge the battery within the camera using a USB connection linked to an outlet. Others charge the battery into a separate charger. Make sure you use the correct Kodak camera model system. In addition, as stated above, examine the battery to seek damage or dirt. In addition, as stated above, examine the battery to seek damage or dirt.
3. The camera won’t capture pictures
First, ensure that there is space for the memory card to capture additional pictures. Next, switch off the Kodak camera for 10 seconds and hit the power button again. Finally, if you can still take pictures, try removing your battery to reset the camera for at least 15 minutes.
Bear in mind, however, that it is not possible to take another image before the flash is reloaded and the previous image is transferred to your memory and may cause a small delay if you attempt to snap many images consecutively.
4. The camera won’t switch off
Remove the camera battery and leave it at least 15 minutes away. Ensure your battery is also fully charged since a lack of power may lock the camera. The picture or horizontal lines of the LCD are inverted. In most cases, this condition implies a major camera malfunction that is likely to need a repair center.
5. The lens may not retract completely within the camera
Make sure that any camera wires are removed. Make sure that the lens housing contains no extraneous particles or sticky substances. Ensure that the batteries are completely charged. Don’t push the lens back into the housing physically. Furthermore, if the camera has recently fallen, the lens housing may be jammed, indicating that the Kodak camera might need repair.
6. The pictures are a little blurred
Make sure that the lens is clear and not fingerprinted. Second, it may be difficult for the camera to focus. If you are attempting to close up, utilize macro mode to get a better focus. Try to pre-focus by holding down the shutter to guarantee a crisp focus. Camera shaking may make a Kodak beginner-level camera somewhat blurred, so try using a tripod.
Frequently asked questions
How can one reset a Kodak camera?
For 10 seconds, hold and press the factory reset on the camera’s side. The lighting will flash red before turning off. After factory resetting your camera, you’ll need to set it up again. Press the up/down arrow buttons to select.
Select or Reset with the up/down arrow buttons, then hit the button and right arrow knob to enter the menu. To select Yes or No, use the up/down arrow buttons.
Conclusion
If you encounter difficulties from time to time with your Kodak camera, it is best to solve your problems. Always make sure that the camera is not utilized in very cold temperatures. Camera repair shops may still take Kodak repair cameras. Kodak might still fulfill warranties if required, but most cameras are already outside of warranty. You may still attempt to solve Kodak cameras just on your own.
If you follow all the above steps and procedures and your Kodak camera does not respond still, it could be having a serious problem. Repeat the steps and tighten the connections. If it does not respond, you should consider contacting an expert with immediate effect. A professional should explain the problem to you just in case it happens again.